Objects in Javascript
Getting Started
|
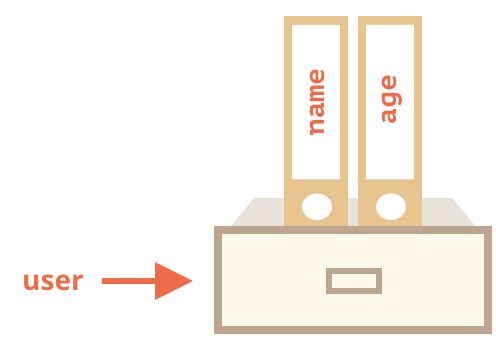
Objects in Javascript work similar to that of arrays,
Except you can store a range of different variables in them. For example a car may have these properties: Make: Nissan Modal: Primera Year:1999 Price: $5000 Color: Blue If I was to make it into a javascript object it would look like this: let car = {make:"Nissan", model:"Primera", Year:1999, Color:"blue"}; Now if I wanted to show the make I would write alert(car.make); If you look to the right there is a better way of laying it out. Task: Create a new HTML page for classes and objects 1.) Create a new page with a single button 2.) Declare the object like you see to the right 3.) Make it so that when you click the button it alerts one of the properties. |

|
Objects in String
|
In order to tell a story about a the car previously I might write:
alert(`Once a young man went to buy a ${car.make} ${car.model} however, it costed $${car.price} so he couldn't afford it`); Task: Create the story above, use a classmate instead. Now it is your turn. Task: Create a story using two objects (i.e. a pet and a book). Use your own predefined objects that have at least 3 properties. |

|
Class Constructors & JavaScript
|
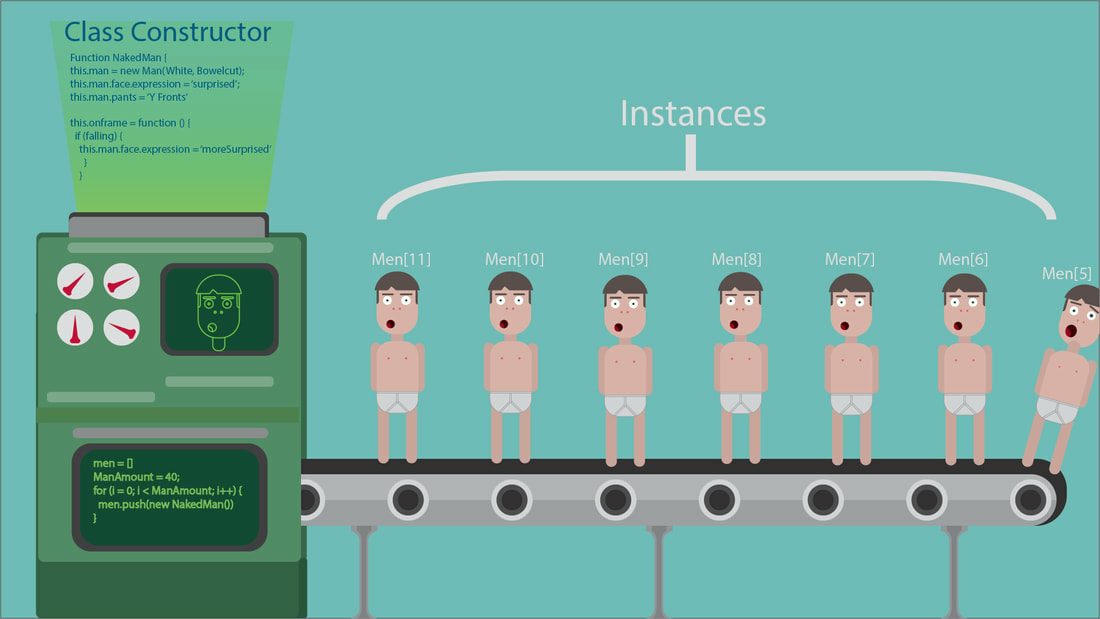
Often at times we don't just want to create one object.
Like if we worked in a car yard we wouldn't want just one car object, when you have 40. We can create was is known as a class or a constructor, which is basically a blue print in which we make the classes. The class with the constructor looks like this: 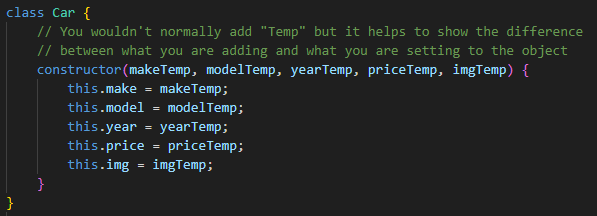
Note that this is not an object, this is merely a mold for an object.
To actually create an object we type in this: 
Task 1: Get rid of the object in the previous instruction, and make two new car objects using the class method
Task 2: Create 2 class constructors in Javascript for any object of your choice. Then use then create 2 objects for each class. Use them to tell a story |

|
Methods within Objects
|
As you notice from my story earlier, I this code a couple of times:
${car.make} ${car.model} We can make our own methods to do this automatically. We simply add this as a property into the class (in addition to the constructor): 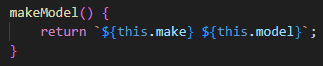
Now if I were to run newCar.MM it would automatically combine the two together.

|
Tasks: Create some Methods
1.) Create the method that joins the Make and Model together 2.) Create an alert to display this. 3.) Create another method that is a new price with GST included 4.) Create an alert to show the new price. 5.) Create a method that will update the price of the car by asking the user for a new amount. |
Custom HTML from classes
|
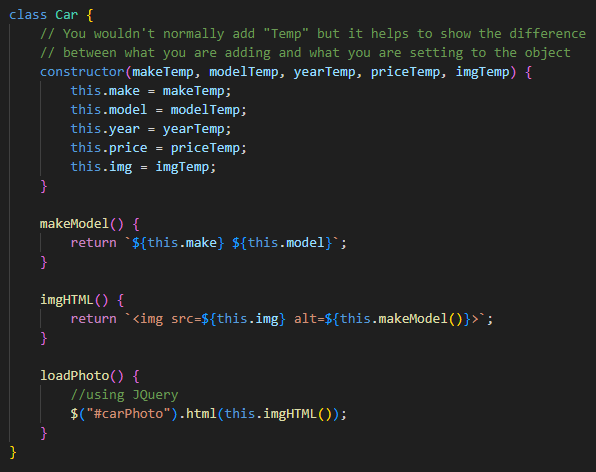
Now that we have a class we can make custom HTML from it.
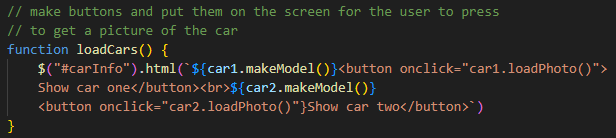
Task: List the Make and Models of the Cars with buttons that when pressed will load a picture. 1.) Modify your HTML so that it it has two div tags with ID's for carPhoto and an ID for Car list 2.) Create a button called load cars, that calls a function called load cars into a list 3.) Add an extra parameter to the class of car called img, insert a reference to an image of each car. (check picture to right to get an idea.) 4.) Create a method that will automatically create an image tag using that variable. 5.) Create a method that loads the picture text into the div tag called carPhoto 6.) Create a button next to each listed car that calls this function. |
|
Arrays, and Classes
|
Lets start again. This time we are going to make 4 objects.
Lets choose an object of your choice (Game Consoles, Burgers, etc). I am going to go with burgers because at the time of writing this I am hungry. This time we are going to store the objects in an array. This would look like this: let burgers = []; burgers.push(new Burger("CheeseBurger", "beef", 5, "cheeseburger.jpeg")); Task: Create a similar program using an array to store the objects. Task 2: Load the array up with 4 different versions of your object. Task 3: Using a for loop display all 4 of your objects on your web page |

|
Click and Alert
|
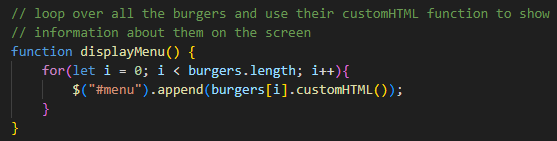
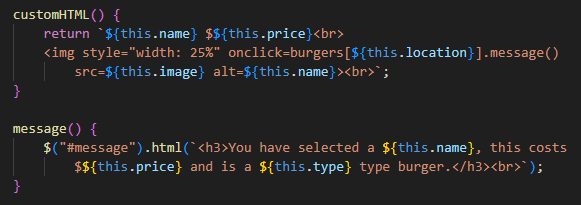
When we create our object, if we store the position of the object in the array then we can do a bit more with it.
To do this we can just use the array.length command. Now we can use this to make it so that when you click on an image it alerts you the name of that burger. Check the code on the right: |

|
A button that will create another object from an object.
|
Your Final Task:
Create another class called shopping item. It should contain hold name, price and array position When you click on the image it should add the name and price to a shopping list. It should update with the price and total. Check it out below: |

|
