Recap Year 12 Microsoft Access
Goal: Create a database to store prisoner information
|
Our Goal is to make a database for arrested celebrities
We then want to be able to display this in a report. We should be able to remember what to do from the last year, but this is a recap |

|
Creating a Database
|
1.) Create a new folder called "Access Level 3"
2.) Create a sub folder called "Prisoners Recap" 3.) Right click in the folder and click "new" then "Microsoft Access Database" 4.) Call it "prisoners" 5.) Open the Database |

|
Creating a Table
|
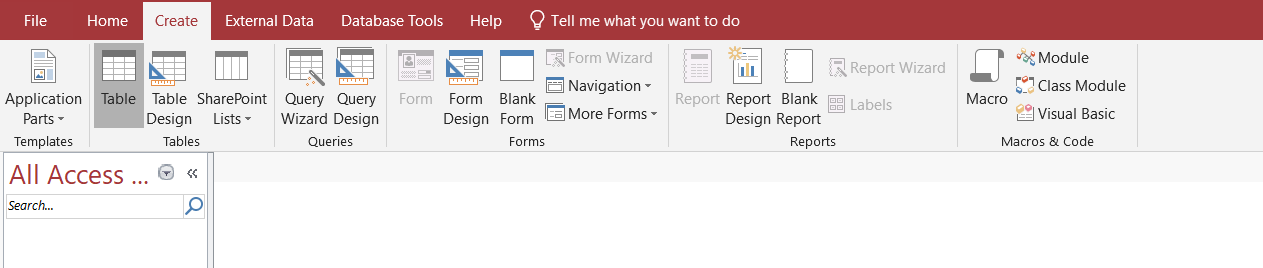
1.) Click the "create" tab at the top of the page
2.) Click "table" 3.) Then click "Design View 
4.) Save the table as Prisoners
|
|
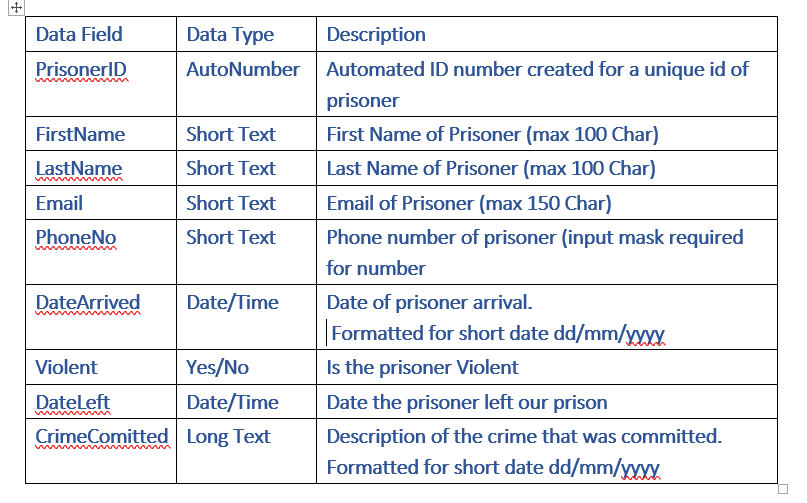
Managing Fields
|
A couple of notes before you make fields
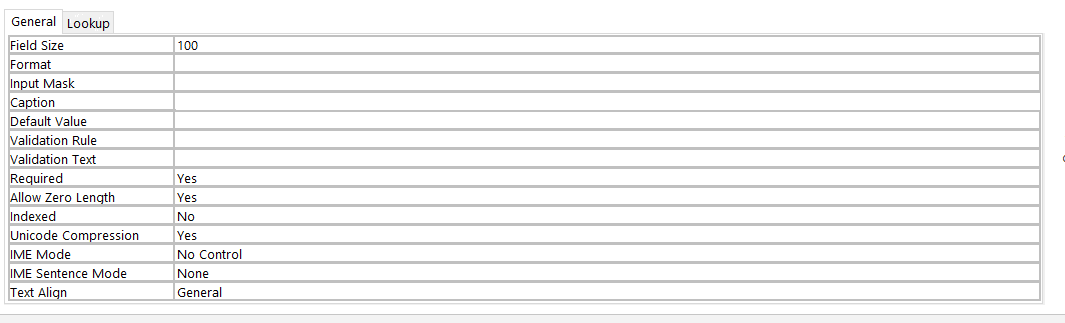
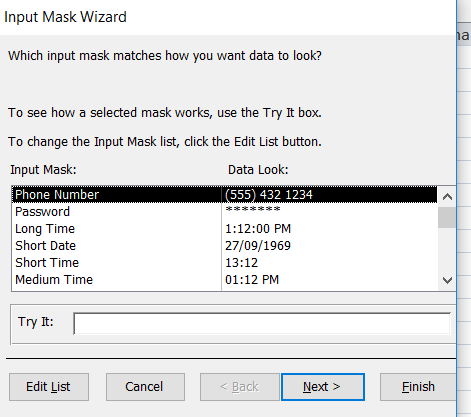
Primary ID's: You need a primary ID that has a key next to it. This lets the database distinguish between records. I.e. what would happen if you had two bill gates who were different people? an ID number helps keep individual records separate. Rename the ID to something more useful: i.e. PrisonerID Field Names: Field names should be one world using uppercase to separate the words: e.g. PhoneNumber or FirstName. Validation: You need to ensure that the user cannot enter data they are not suppose to. Using First Name as an example we can do that by doing the following: A.) Change the field size to 100 characters for a first name, we don't need that many B.) You want to change required to "yes" the user must enter a first name. Input Masks: If you require the user to enter a phone number or a date you can ensure that the user must enter the data in a particular format. If you are storing passwords you should use the password input box. Data Types: Unless otherwise stated always use short text for your fields but here is a break down of other types you may want to use Number: Only use this if you have to add, subtract, minus or divide. If you have to use calculations use this... do not use this for phone numbers as some company use letters and not numbers. Input Masks can force users to use numbers Currency: Same as Number but use when a cash value has to be stored Date/Time: Use this for any dates store and use the format tool to store the date in the format you want. Yes/No: Use this for any true or false statements i.e. LeftPrison or PaidFees Long Text: Use this anytime you have to enter a description |

|
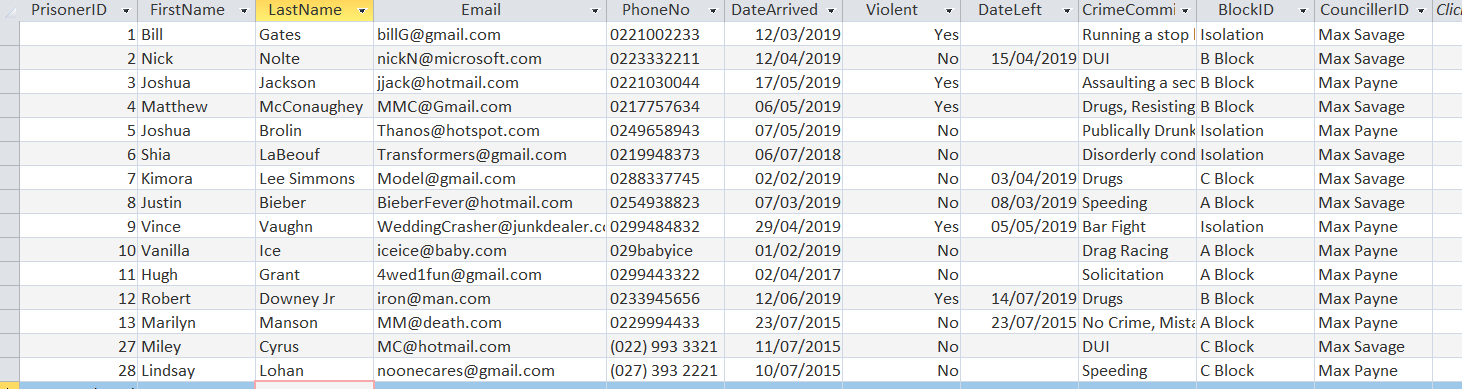
Prisoner Table Task
|
Follow the documentation on the right to create our prisoners table.
Please enter the following data:
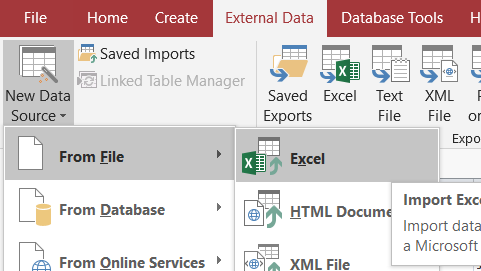
Click External data and then "new data source" and import the data.
Make sure the important fields are required
|
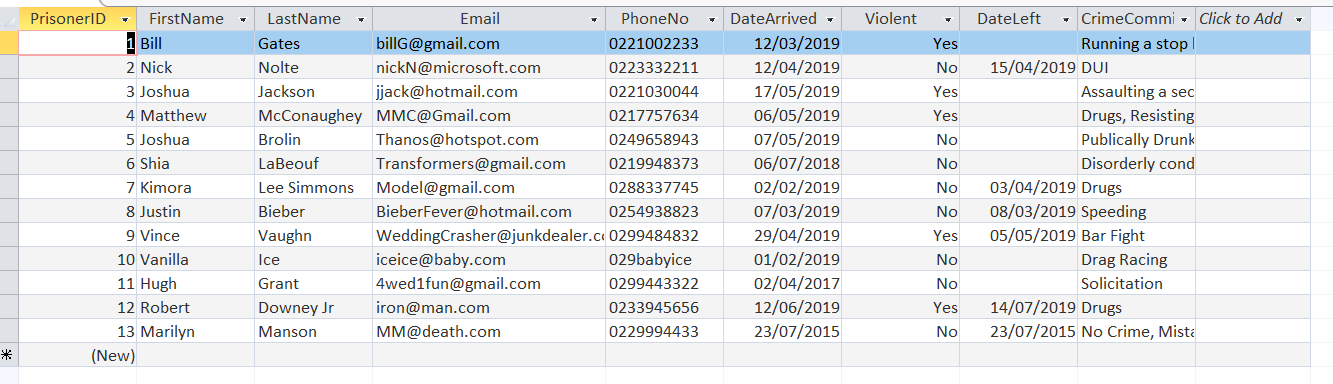
Should look like this:
| ||
Relationships and Drop downs
|
Within Databases we use relationships to define a connection between two tables.
For our example with prisoners we want to be able to assign each prisoner to ether A block, B block, C Block or Isolation. We also want each prisoner to be assigned a Counsellor or either "Max Payne" or "Max Savage" An ERD diagram for this would look like the following the picture on the right. Tasks: 1.) Create the two extra tables for cell blocks and Counsellors, enter or make up the data. 2.) Create two extra fields for the prisoner called BlockID and CounsellorID set their type to number Connecting the databases
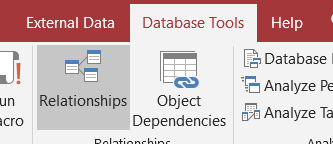
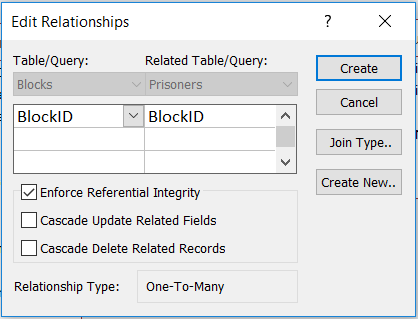
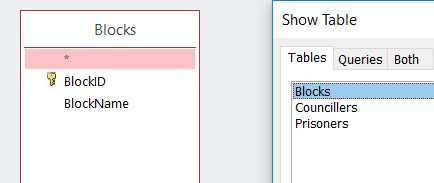
In order to connect the database together with relationships follow these instructions:
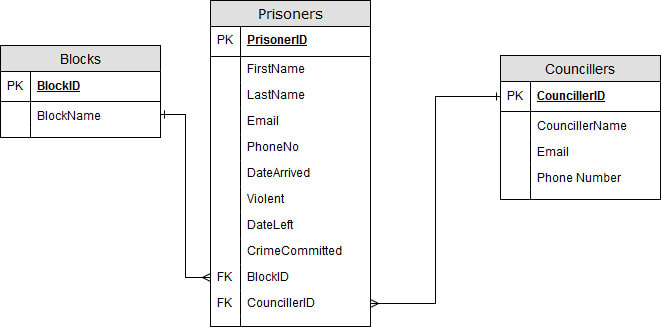
1.) Close all the tables you are working on. (important will not work otherwise) 2.) Click "Database Tools" --> "Relationships" 3.) Add all the tables once, and close the "show table" dialogue box" 4.) Drag the Primary Key "Block ID" of the blocks table into the foreign key "Block ID of the prisoners table. 5.) Click "enforce relational integrity". Then click "create" 6.) Repeat steps 4-6 for the Councillor ID's 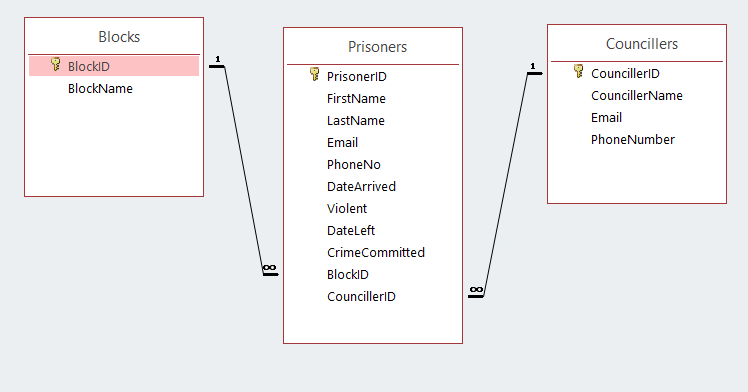
It should look like the above picture
Drop Down Menus
Now is where relationships get really good!
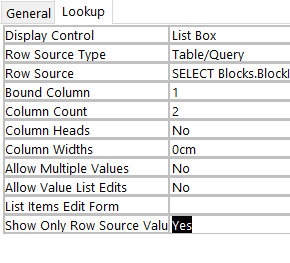
Task: Create a drop down box for the blocks 1.) Go to your prisoners table and click design view. 2.) Click on block ID and select the "lookup" tab at the bottom 3.) Change the type to "list box" and click the three dots next to row source. 4.) Add the blocks table 5.) Double click on "blockID" and "blockName" in that order making sure the id is at the front. 6.) Click close and save. 7.) Change the rest of the settings to match the picture on the right. 8.) If all goes well we can have a drop down box like this: 
Repeat steps 1-8 for the councillerID
Task: Add Councillors and blocks to each inmate as per the following lists:
|
We will cover how to create one of these diagrams in a future session


|
|
A Block Prisoners
Justin Bieber Vanilla Ice Hugh Grant Marilyn Manson |
B Block Prisoners
Nick Nolte Joshua Jackson Matthew McConaughey Robert Downey Jr |
C Block Prisoners
Kimora Lee Simons |
Isolation Prisoners
Bill Gates Joshua Brolin Shia Labeouf Vince Vaughn |
|
Councillor - Max Savage:
Justin Bieber Nick Nolte Kimera Lee Simons Bill Gates Matthew McConaughey Shia Labeouf |
Counciller - Max Payne
Vanilla Ice Joshua Jackson Joshua Brolin Hugh Grant Marilyn Manson Robert Downy Jr Vince Vaughn |
News Flash - Miley Cyrus has been arrested for DUI TODAY!!! add her to C Block with Max Savage as a counsellor
Lindsay Lohan has also been arrested yesturday for speeding, but no one cares add her to C block as well with Max Payne as a counciller...
Both are non-violent
Lindsay Lohan has also been arrested yesturday for speeding, but no one cares add her to C block as well with Max Payne as a counciller...
Both are non-violent
Queries & Reports
|
The commissioner would like three reports printed and on his desk:
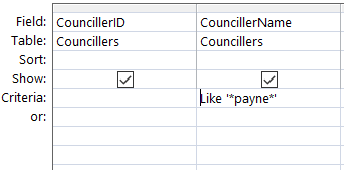
1.) He believes that Max Payne is smuggling contraband to prisoners. You will need to print out a list of prisoners that Max Payne is the Counsellor for. This should show Counsellor Name, Prisoner first name, last name, date arrived. 2.) He believes all violent criminals should be in isolation He wants a list of prisoners that are currently in prison, violent and not in an isolation block given to him. 3.) A true villain is hiding in A block, but he has been there for a while Find the true villain by doing a search on A block criminals who arrived more then a year ago All three reports need to be printed out and handed to him. (pdf is fine). Creating a query
To create a query do the following
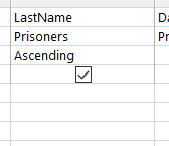
Based of Query 1. 1.) Click Create, and then "Query Design" 2.) Click the tables you want, in this case pick Councillors and Prisoners 3.) Pick the fields you want Councillor name, prisoner first name, prisoner last name, date arrived 4.) You only want prisoners where Max Payne is the Counsellor so enter: like '*payne*' This will pick any Councillor where the name payne is in their name. 5.) You should sort the names ascending by prisoner last name. 6.) You don't need to show Counsellor ID's, hide them 7.) Save and run your query it should return these results 
|

|
Queries 2 and 3
|
You will have to develop Queries 2 and 3 yourself, but the following commands should be able to help you for query search criteria.
Criteria commands True Not "Isolation" Is Null Query 3 Criteria Commands Is Null Like "*A Block*" <Date() - 1400 (dates that are more then 1400 days old) Always sort by last name |
Results for Query 2


|
Reports - The Last Section
|
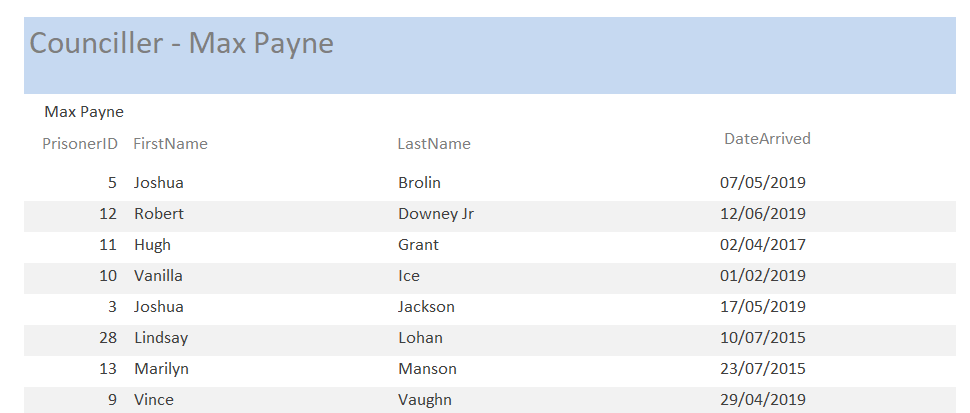
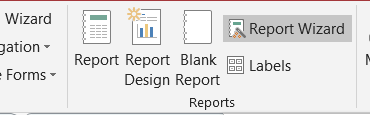
To create your reports feel free to use the report wizard.
For the first Report: 1.) Click Report Wizard 2.) Select the query you wish to use, with the information you want to use. 3.) You want to sort the query by Counsellors, and make sure it is sorted by ascending. 4.) Finish creating the report 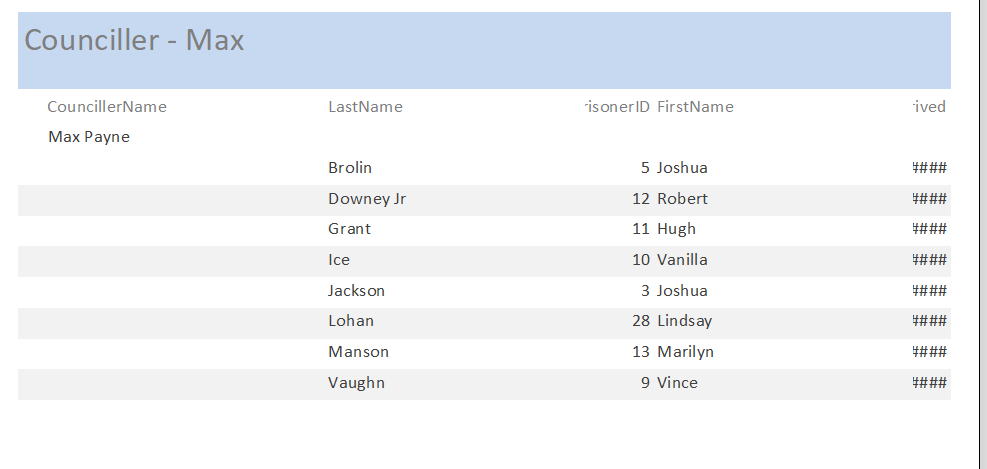
You now want to change the report formatting around and design so that all fields are viewable, try to make it like this:
|

Final Task
Create the other 2 reports in an appropriate format
Get your teacher to check it for you Save the database, as we will be using it later. |
